2025/11/09 Updated by 
Docker Image を自作する (6b)
PyTorch23.07 + sshd + jupyter
[Up]


このページ内での表記:
「ホストOSの対話環境」は背景色を黄色(lightyellow)で表す。
「Conainer 内の root 権限の対話環境」は背景色を水色(azure)であらわす。
「Conainer 内の一般ユーザ権限の対話環境」は背景色を赤色(#ffeeee)であらわす。
「他のPCの対話環境」は紫色(#eeeeff)で表す。
目的
前提条件
- nVidia のGPU を装備した Windows 11 マシンに、
Docker on Windows (GPU) の手順で
Docker Desktop がインストールされている。
-
Docker Host (= Windows) の Ubuntu (WSL2) から
docker コマンドが実行できる。
Python, PyTorch, TensorFlow のバージョンについての検討事項
- 公式の github の README.md の python インストールの記述を見ると、
Python 3.10
を想定しているようだ。
ゼロから学ぶLLM/設定/01_オプションのPythonセットアップ設定/
https://github.com/rasbt/LLMs-from-scratch/tree/main/setup/01_optional-python-setup-preferences"

- 公式の github からソースコードをダウンロードする。
| 公式コードをダウンロードする |
$ git clone https://github.com/rasbt/LLMs-from-scratch.git
Cloning into 'LLMs-from-scratch'...
remote: Enumerating objects: 7575, done.
remote: Counting objects: 100% (50/50), done.
remote: Compressing objects: 100% (38/38), done.
remote: Total 7575 (delta 18), reused 19 (delta 12), pack-reused 7525 (from 3)
Receiving objects: 100% (7575/7575), 15.12 MiB | 15.19 MiB/s, done.
Resolving deltas: 100% (4281/4281), done.
$ ls LLMs-from-scratch
appendix-A  appendix-D  ch02  ch05  CITATION.cff  pkg             reasoning-from-scratch
appendix-B  appendix-E  ch03  ch06  LICENSE.txt   pyproject.toml  requirements.txt
appendix-C  ch01        ch04  ch07  pixi.toml     README.md       setup
Cloning into 'LLMs-from-scratch'...
remote: Enumerating objects: 7575, done.
remote: Counting objects: 100% (50/50), done.
remote: Compressing objects: 100% (38/38), done.
remote: Total 7575 (delta 18), reused 19 (delta 12), pack-reused 7525 (from 3)
Receiving objects: 100% (7575/7575), 15.12 MiB | 15.19 MiB/s, done.
Resolving deltas: 100% (4281/4281), done.
$ ls LLMs-from-scratch
appendix-A appendix-D ch02 ch05 CITATION.cff pkg reasoning-from-scratch
appendix-B appendix-E ch03 ch06 LICENSE.txt pyproject.toml requirements.txt
appendix-C ch01 ch04 ch07 pixi.toml README.md setup
|
- ソースコードの中の requirements.txt に、実行に必要なパッケージが記述されている。
| LLMs-from-scratch/requirements.txt |
torch>=2.2.2,<2.6; sys_platform == 'darwin' and platform_machine == 'x86_64'  # Intel macOS
torch >= 2.2.2; sys_platform != 'darwin' or platform_machine != 'x86_64'   # all chapters
jupyterlab >= 4.0          # all
tiktoken >= 0.5.1          # ch02; ch04; ch05
matplotlib >= 3.7.1        # ch04; ch06; ch07
tensorflow>=2.16.2; sys_platform == 'darwin' and platform_machine == 'x86_64'  # Intel macOS
tensorflow >= 2.18.0; sys_platform != 'darwin' or platform_machine != 'x86_64'   # ch05; ch06; ch07
tqdm >= 4.66.1             # ch05; ch07
numpy >= 1.26             # dependency of several other libraries like torch and pandas
pandas >= 2.2.1            # ch06
psutil >= 5.9.5            # ch07; already installed automatically as dependency of torch
|
- PyTroch のバージョンは 2.2.2 以上 2.6 未満。
- TensorFlow のバージョンは 2.16.2 以上または 2.18.0 以上。
追加の検討 (BONUSコードも含めてすべてのコードの実行に必要なパッケージを調べる)
| すべての requirements*.txt をまとめる |
find LLMs-from-scratch -name requirements\*.txt -exec printf "# {}\n" \; -exec cat {} \; -exec printf "\n\n" \; > requirements_all.txt
|
| 必要なパッケージをすべて含んだ requirements_all.txt |
# LLMs-from-scratch/requirements.txt
torch>=2.2.2,<2.6; sys_platform == 'darwin' and platform_machine == 'x86_64'  # Intel macOS
torch >= 2.2.2; sys_platform != 'darwin' or platform_machine != 'x86_64'   # all chapters
jupyterlab >= 4.0          # all
tiktoken >= 0.5.1          # ch02; ch04; ch05
matplotlib >= 3.7.1        # ch04; ch06; ch07
tensorflow>=2.16.2; sys_platform == 'darwin' and platform_machine == 'x86_64'  # Intel macOS
tensorflow >= 2.18.0; sys_platform != 'darwin' or platform_machine != 'x86_64'   # ch05; ch06; ch07
tqdm >= 4.66.1             # ch05; ch07
numpy >= 1.26             # dependency of several other libraries like torch and pandas
pandas >= 2.2.1            # ch06
psutil >= 5.9.5            # ch07; already installed automatically as dependency of torch


# LLMs-from-scratch/ch02/02_bonus_bytepair-encoder/requirements-extra.txt
requests
tqdm
transformers>=4.33.2


# LLMs-from-scratch/ch04/02_performance-analysis/requirements-extra.txt
thop

# LLMs-from-scratch/ch05/06_user_interface/requirements-extra.txt
chainlit>=1.2.0

# LLMs-from-scratch/ch05/07_gpt_to_llama/requirements-extra.txt
blobfile>=3.0.0
huggingface_hub>=0.24.7
ipywidgets>=8.1.2
safetensors>=0.4.4
sentencepiece>=0.1.99


# LLMs-from-scratch/ch05/11_qwen3/qwen3-chat-interface/requirements-extra.txt
chainlit>=1.2.0
huggingface_hub>=0.34.4
llms_from_scratch>=1.0.18  # to import code from this repo
safetensors>=0.6.2
tokenizers>=0.21.1

# LLMs-from-scratch/ch06/03_bonus_imdb-classification/requirements-extra.txt
transformers>=4.33.2
scikit-learn>=1.3.0

# LLMs-from-scratch/ch06/04_user_interface/requirements-extra.txt
chainlit>=1.2.0

# LLMs-from-scratch/ch07/02_dataset-utilities/requirements-extra.txt
openai>=1.30.3
scikit-learn>=1.3.1
tqdm>=4.65.0

# LLMs-from-scratch/ch07/03_model-evaluation/requirements-extra.txt
openai>=1.30.3
tqdm>=4.65.0


# LLMs-from-scratch/ch07/05_dataset-generation/requirements-extra.txt
openai>=1.30.3
tqdm>=4.65.0


# LLMs-from-scratch/ch07/06_user_interface/requirements-extra.txt
chainlit>=1.2.0
|
nVidia GPU (CUDA) に対応した Docker Image を探す: PyTorch
- PyTorch 2.2.2 を使うことにする。
- PyTorch のバージョンと CUDA の関係を調べる。
PyTorch の公式ドキュメント
Install previous versions of PyTorch
を見ると、PyTorch 2.2.2 には、
CUDA 11.8 または CUDA 12.1
が対応しているようだ。
| Install previous versions of PyTorch |
v2.2.2
Conda
OSX
# conda
conda install pytorch==2.2.2 torchvision==0.17.2 torchaudio==2.2.2 -c pytorch
Linux and Windows
# CUDA 11.8
conda install pytorch==2.2.2 torchvision==0.17.2 torchaudio==2.2.2 pytorch-cuda=11.8 -c pytorch -c nvidia
# CUDA 12.1
conda install pytorch==2.2.2 torchvision==0.17.2 torchaudio==2.2.2 pytorch-cuda=12.1 -c pytorch -c nvidia
# CPU Only
conda install pytorch==2.2.2 torchvision==0.17.2 torchaudio==2.2.2 cpuonly -c pytorch
Wheel
OSX
pip install torch==2.2.2 torchvision==0.17.2 torchaudio==2.2.2
Linux and Windows
# ROCM 5.7 (Linux only)
pip install torch==2.2.2 torchvision==0.17.2 torchaudio==2.2.2 --index-url https://download.pytorch.org/whl/rocm5.7
# CUDA 11.8
pip install torch==2.2.2 torchvision==0.17.2 torchaudio==2.2.2 --index-url https://download.pytorch.org/whl/cu118
# CUDA 12.1
pip install torch==2.2.2 torchvision==0.17.2 torchaudio==2.2.2 --index-url https://download.pytorch.org/whl/cu121
# CPU only
pip install torch==2.2.2 torchvision==0.17.2 torchaudio==2.2.2 --index-url https://download.pytorch.org/whl/cpu
|
- nVidia が公開している PyTorch Docker Image を調べる。
NVIDIA Optimized Frameworks: PyTorch Release Notes
- Python 3.10 を採用しているのは PyTorch:23.05-24.10
- CUDA 12.1 を採用しているのは PyTorch:23.03-23.07
- 両者の AND 集合は PyTorch:23.05, 23.06, 23.07
- Docker Image のベースとして PyTorch:23.07 を採用する。詳細な仕様は以下の通り。
https://catalog.ngc.nvidia.com/orgs/nvidia/containers/pytorch/tags?version=25.09-py3
PyTorch Release 23.07

Ubuntu 22.04 including Python 3.10
NVIDIA CUDA® 12.1.1
NVIDIA cuBLAS 12.1.3.1
NVIDIA cuDNN 8.9.3
NVIDIA NCCL 2.18.3
NVIDIA RAPIDS™ 23.06
Apex
rdma-core 39.0
NVIDIA HPC-X 2.15
OpenMPI 4.1.4+
GDRCopy 2.3
TensorBoard 2.9.0
Nsight Compute 2023.1.1.4
Nsight Systems 2023.2.3.1001
NVIDIA TensorRT™ 8.6.1.6
Torch-TensorRT 1.5.0.dev0
NVIDIA DALI® 1.27.0
MAGMA 2.6.2
JupyterLab 2.3.2 including Jupyter-TensorBoard
TransformerEngine 0.10.0+96ed6fc
PyTorch quantization wheel 2.1.2
Container   Ubuntu   CUDA      PyTorch          TensorRT
version              Toolkit
---------  --------  -------  ---------------   --------
23.07      22.04     12.1.1   2.1.0a0+b5021ba    TensorRT 8.6.1.6
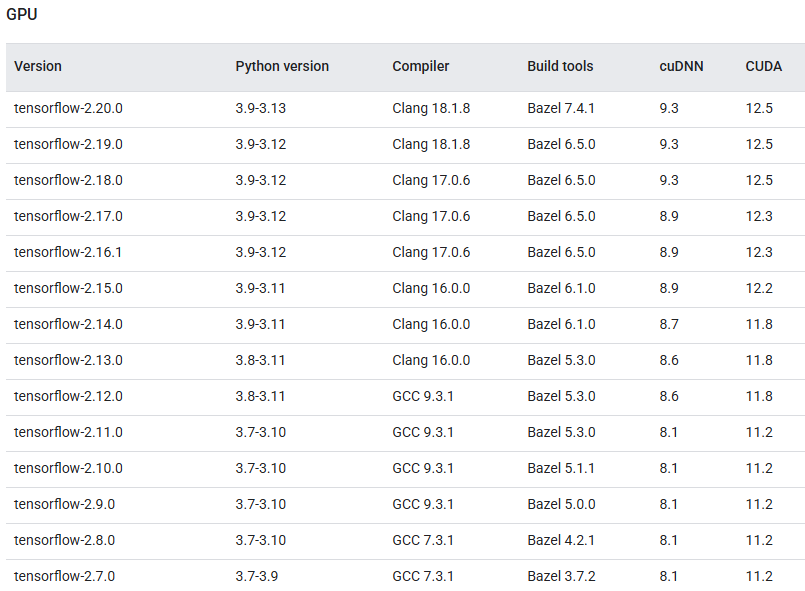
(参考) nVidia GPU (CUDA) に対応した Docker Image を探す: TensorFlow
 TensorFlow Release 23.07

Ubuntu 22.04
  Note:
  The 23.07-tf2-py3 container image contains Python 3.10.6.
NVIDIA CUDA® 12.1.1
NVIDIA cuBLAS 12.1.3.1
cuTENSOR 1.7.0.1
NVIDIA cuDNN 8.9.3
NVIDIA NCCL 2.18.3
NVIDIA DALI® 1.27.0
NVIDIA RAPIDS™ 23.06
Horovod 0.28.1
OpenMPI 4.1.4+
OpenUCX 1.15.0
SHARP 3.0.2
GDRCopy 2.3
NVIDIA HPC-X 2.15
TensorBoard2.12.0
rdma-core 39.0
NVIDIA TensorRT™ 8.6.1.6
TensorFlow-TensorRT (TF-TRT)
Nsight Compute 2023.1.1.4
Nsight Systems 2023.2.3.1001
JupyterLab 2.3.2 including Jupyter-TensorBoard
Container   Ubuntu   CUDA     TensorFlow        TensorRT
version              Toolkit
---------  --------  -------  ---------------   --------
23.07      22.04     12.1.1   2.12.0            TensorRT 8.6.1.6
「つくって学ぶ!LLM自作入門」が動作する Docker Image (GPU 版) を作成する
方針
- NVIDIA PyTorch Container 23.07 をベースに用いて docker image を生成する。
- ssh サーバ (sshd) を自動起動する。
- サーバの自動起動には supervisord を用いる。
- Container の初回起動時に、SSH のポート番号を設定する。(SSHD_PORT 変数, デフォルト値: 22)
- Container の初回起動時に、新規ユーザを作成する。(デフォルト値: geust)
- Container の初回起動時にコマンドが与えられた場合は、フォアグラウンドで実行する。
- 生成する Docker Image 名は llm_diy_torch2307b
作成手順
- Windows11 上の Ubuntu-20.04 (WSL) を使って作業を進める。
Windows において WSL のファイルシステムは \\wsl$\Ubuntu-20.04\home\nitta にあることに注意すること。
Ubuntu-20.04 から、Windows11 のホームディレクトリは /mnt/c/User/nitta/ として見える。
- 作業用フォルダを作成する
  $ cd /mnt/c/Users/nitta/Documents/docker
  $ mkdir -p llm_diy_torch2307b
- 作業用フォルダの中に Dockerfile を作成する。
- Dockerfile中の パスワード の部分は、推測されにくい文字列に必ず変更すること。
- Dockerfile 中の Run 命令は docker image を build する時に実行されるので、変数を使っていても build時の値で固定される。
- Container の初回起動時に変数の値を変更したいコマンド(たとえば、SSHD_PORT )は、ENTRYPOINT で呼び出すシェルスクリプトの中で実行する。
- OpenSSH サーバをインストールする。
- supervisor サーバをインストールする。これはContainer を起動するたびに他のサーバを自動起動する役目を担う。
| Dockerfile |
# ゲストOS: Ubuntu 22.04 LTS

FROM nvcr.io/nvidia/pytorch:23.07-py3

# Change Your Own UNAME, UID, GID, PASS

ENV UNAME=guest
ENV UID=3000
ENV GID=3000
ENV PASS=password

ENV SSHD_PORT=22

# 必要なパッケージのインストール

RUN apt-get update && \
    DEBIAN_FRONTEND=noninteractive apt-get install -y \
    sudo \
    bash \
    openssh-server \
    supervisor \
    && rm -rf /var/lib/apt/lists/*


# SSH 設定: パスワード認証を有効化

RUN sed -i 's/#PasswordAuthentication yes/PasswordAuthentication yes/' /etc/ssh/sshd_config && \
    sed -i "s/^#Port.*/Port ${SSHD_PORT}/" /etc/ssh/sshd_config && \
    mkdir /var/run/sshd


# supervisord の設定ファイルを設置する (Daemon 起動用)

RUN mkdir -p /var/log/supervisor
COPY supervisord.conf /etc/supervisor/conf.d/supervisord.conf


##### "Build a LLM from scratch"

WORKDIR /app

# RUN git clone https://github.com/rasbt/LLMs-from-scratch.git
COPY requirements_all.txt /app/

WORKDIR /app
RUN pip install --no-cache -r requirements_all.txt

#####

# ポート開放

EXPOSE 22


# Copy Shell Script "entrypoint.sh"

COPY entrypoint.sh /entrypoint.sh
RUN chmod +x /entrypoint.sh


######

ENTRYPOINT ["/entrypoint.sh"]

CMD []
|
- 作業用フォルダの中に entrypoint.sh を作成する
- Contaienr の初回起動時に、SSHサーバの待ち受けポート番号を設定する。
- Container が起動されるたびに supervisor デーモンを起動する。SSHサーバの起動は supervisor が行う。
| entrypoint.sh |
#!/bin/bash
set -e

if [ ! -f /var/app/.initialized ]; then
    ######## First Time ########

    echo "First run. Setting up ..."
    mkdir -p /var/app
    touch /var/app/.initialized

    # ユーザーが存在しない場合のみ作成する
    if id "${UNAME}" &>/dev/null; then
        echo "User ${UNAME} already exists. Skipping creation."
    else
        # 同名グループが無ければ作成する
        if ! getent group "${UNAME}" &>/dev/null; then
            echo "Creating group ${UNAME} with GID=${GID}"
            groupadd -g ${GID} ${UNAME}
        else
            echo "Group ${UNAME} already exists. Skipping group creation."
        fi

        echo "Creating user ${UNAME} with UID=${UID}, GID=${GID}"
        useradd -m -u ${UID} -g ${GID} -s /bin/bash ${UNAME}
        echo "${UNAME}:${PASS}" | chpasswd
        usermod -aG sudo ${UNAME}
    fi

    # ホームディレクトリの Owner が root:root になることがあるので明示的に変更する。
    chown -v ${UNAME}:${UNAME}  /home/${UNAME}

    # SSHD のポート番号を変更する
    sed -i "s/^Port.*/Port ${SSHD_PORT}/" /etc/ssh/sshd_config


else
    ######## Second Time or Later ########

    echo "Starting for the second time or later ..."

fi

# supervisord start (background)
/usr/bin/supervisord -c /etc/supervisor/supervisord.conf &

# Execute Commands in CMD

if [ "$#" -gt 0 ]; then
    exec "$@"
else
    echo "No command provided. Starting bash ..."
    exec bash
fi
|
- 作業用フォルダの中に supervisord.conf を作成する
- supervisord の本来の設定ファイルは
/etc/supervisor/supervisord.conf
であり、
supervisord パッケージのインストールと同時にインストールされる。
- 自動でインストールされる /etc/supervisor/supervisord.conf は、
追加の設定を /etc/supervisor/conf.d/*.conf から読み込む。
- 以下で作成するsupervisod.confは追加の設定なので、
/etc/supervisor/conf.d/supervisord.conf として配置する。
- sshd のログをとるために sshd に -e オプションをつけて起動して、sshdプロセスの標準出力にログを出力させる。
- 標準出力と標準エラー出力をそれぞれ /var/log/sshd_std{out,err}.log というファイルに記録する。
| supervisord.conf |
# supervisord の設定ファイル

[supervisord]
nodaemon=true


# sshd を起動する

[program:sshd]
command=/usr/sbin/sshd -D -e
autostart=true
autorestart=true
stdout_logfile=/var/log/sshd_stdout.log
stderr_logfile=/var/log/sshd_stderr.log
|
- 上記で作成したファイルを以下のように配置する。llm_diy_torch2307b.zip
  llm_diy_torch2307b/
    |
    +-- Dockerfile
    |
    +-- entrypoint.sh
    |
    +-- supervisord.conf
    |
    +-- requirements_all.txt
- Image を build する。
  $ docker build -t llm_diy_torch2307b .
  ...
成功
- 生成した Image を確認する
$ docker image ls
REPOSITORY               TAG         IMAGE ID       CREATED          SIZE
llm_diy_torch2307b       latest      b2b8acda9af2   52 seconds ago   29.4GB
llm_diy_torch2307        latest      ae6c6c06ccf1   5 days ago       29GB
...
Container 用の永続的なファイルシステムを作成する
コンテナに永続的なファイルシステムを提供するために、1777 のパーミッションでフォルダを作っておく。
skicky bit が on (1777) のフォルダには、
「誰でもファイルを作成できるが、作成した本人だけがファイルを変更したり消したりできる」
という特徴がある。
$ sudo mkdir -p /home/docker            ← ディレクトリを作成する
$ sudo chmod 1777 /home/docker          ← 誰でもファイルを作成できるが、作成した本人にしか消去できないモードに設定する
$ ls -ld /home/docker                   ← ディレクトリのsticky bit が on になっていることを確認する。
drwxrwxrwt 3 root root 4096  4月 26 15:47 /home/docker
Docker Container を生成する
Image llm_diy_torch2307b
のデフォルトのユーザ情報とSSHサーバ情報を用いて、
新しい Container
llmdiy_01b
を生成する。
- Image から Container を生成して起動する。ユーザ情報はデフォルト値 (guest) を利用する。
Container のファイルシステム内にホストOSのディレクトリをマウントする。
Container を起動するたびに、sshd サーバが起動される。
$ docker run --name llmdiy_01b \
    --shm-size=1g --ulimit memlock=-1 --ulimit stack=67108864 --gpus all \
    --restart always \
    -p 7077:22 -p 8087:8888 \
    -v /home/docker/llmdiy_01b:/mnt/hostos \
    -it llm_diy_torch2307b
起動オプション
- --name: 生成する Container の名前は llmdiy_01b
- --restart always: docker が起動すると、このコンテナも自動起動する。
- -p: ホストOSのポートへのアクセスを、Container のポートにフォワーディングする。
| ポート番号 |
|---|
| ホストOS | ゲストOS |
|---|
| 7077 | 22 |
| 8087 | 8888 |
- -v: ホストOSの /home/docker/llmdiy_01b が Container の /mnt/hostos としてマウントされる。
| マウントポイント |
|---|
| ホストOS | ゲストOS |
|---|
| /home/docker/llmdiy_01b | /mnt/hostos |
- -it: 対話モード。ホストOSの端末をそのまま、Container 内の bash との対話環境として使う。
- 使用する Docker Image は llm_diy_torch2307b
- Container を起動した対話環境が、そのまま Container 内で動作する bash との対話環境になる。root権限でloginした状態である。
First run. Setting up ...       ← 生成された Container 内で entrypoint.sh が実行される
Creating group guest with GID=3000
Creating user guest with UID=3000, GID=3000
ownership of '/home/guest' retained as guest:guest
No command provided. Starting bash ...
2025-11-09 00:08:09,901 CRIT Supervisor is running as root.  Privileges were not dropped because no user is specified in the config file.  If you intend to run as root, you can set user=root in the config file to avoid this message.
2025-11-09 00:08:09,901 INFO Included extra file "/etc/supervisor/conf.d/supervisord.conf" during parsing
2025-11-09 00:08:09,905 INFO RPC interface 'supervisor' initialized
2025-11-09 00:08:09,905 CRIT Server 'unix_http_server' running without any HTTP authentication checking
2025-11-09 00:08:09,905 INFO supervisord started with pid 44
root@37c75c55ceea:/app# 2025-11-09 00:08:10,910 INFO spawned: 'sshd' with pid 332
2025-11-09 00:08:11,943 INFO success: sshd entered RUNNING state, process has stayed up for > than 1 seconds (startsecs)

root@37c75c55ceea:/app#              ← Container 内の対話環境 (root権限の bash) が動く
- (重要) (Container 内で) 直ちに新規ユーザ guest のパスワードを変更する。
# passwd guest
New password:                   ← 新しいパスワード を入力する。
Retype new password:            ← もう一度新しいパスワード を入力する。
passwd: password updated successfully
- (Container 内で) ホストOSのマウントポイントを調べる。
# ls -ld /mnt/hostos
drwxr-xr-x 2 root root 4096 May 11 09:32 /mnt/hostos
- (Container 内で) 新規ユーザのホームディレクトリを調べる。
# ls -ld /home/guest
drwxr-x--- 2 guest guest 4096 May 11 09:32 /home/guest
# ls -la /home/guest
total 20
drwxr-x--- 2 guest guest 4096 May 11 09:32 .
drwxr-xr-x 1 root  root  4096 May 11 09:32 ..
-rw-r--r-- 1 guest guest  220 Mar 31  2024 .bash_logout
-rw-r--r-- 1 guest guest 3771 Mar 31  2024 .bashrc
-rw-r--r-- 1 guest guest  807 Mar 31  2024 .profile
- (Container 内で) Control-P と Control-Q を順にタイプして、ホストOSの対話環境に戻る。
Container 内のシェルは動作したままとなる。
# ^p ^q                ← Container の対話環境を抜ける
$              ← ホストOS 内の対話環境に戻る
- (ホストOS上) Container からマウントされているホストOSのディレクトリを調べる。
$ ls -ld /home/docker/llmdiy_01b
drwxr-xr-x 2 root root 4096 Nov  3 09:00 /home/docker/llmdiy_01b
- (ホストOS上) docker 上の実行中の container の状態を調べる
$ docker container ls
CONTAINER ID   IMAGE               COMMAND            CREATED        STATUS        PORTS                   NAMES
37c75c55ceea   llm_diy_torch2307b   "/entrypoint.sh"   10 hours ago   Up 10 hours   0.0.0.0:7077->22/tcp,   llmdiy_01b
                                                                                   [::]:7077->22/tcp,
                                                                                   0.0.0.0:8087->8888/tcp,
                                                                                   [::]:8087->8888/tcp,
                                                                                   [::]:8087->8888/tcp
...
- (ホストOS上) docker 上のすべての(停止中を含む) container の状態を調べる
$ docker container ls -a
CONTAINER ID   IMAGE               COMMAND            CREATED        STATUS        PORTS                   NAMES
37c75c55ceea   llm_diy_torch2307b   "/entrypoint.sh"   10 hours ago   Up 10 hours   0.0.0.0:7077->22/tcp,   llmdiy_01b
                                                                                   [::]:7077->22/tcp,
                                                                                   0.0.0.0:8087->8888/tcp,
                                                                                   [::]:8087->8888/tcp,
                                                                                   [::]:8087->8888/tcp
...
- (ホストOS上) docker 上の Image の一覧を表示する。
$ docker image ls
REPOSITORY               TAG         IMAGE ID       CREATED          SIZE
llm_diy_torch2307b       latest      b2b8acda9af2   18 minutes ago   29.4GB
llm_diy_torch2307        latest      ae6c6c06ccf1   5 days ago       29GB
torch2302_sshd           latest      642c2e1fae87   3 weeks ago      20.6GB
nvcr.io/nvidia/pytorch   23.07-py3   bd784c42fdf0   2 years ago      19.8GB
nvcr.io/nvidia/pytorch   23.02-py3   7c3375e220ea   2 years ago      20.5GB
Docker Host から ssh を用いてContainer 内の対話環境にアクセスする
- ホストOSから、Continer の guest ユーザのアカウントに ssh でアクセスする。
- localhost からのアクセスはファイアウォールの干渉を受けないので、
ファイアウォールが動作していてもアクセス可能である。
- Container 作成時の -p 7077:22 オプションの指定により、
ホストOSの 7077 番ポートへのアクセスは Container の 22 番ポートにポートフォワーディングされる。
$ ssh -p 7077 guest@localhost            ← ホストOSの 7077 番ポートに sshアクセスする
The authenticity of host '[localhost]:7077 ([127.0.0.1]:7077)' can't be established.
ECDSA key fingerprint is SHA256:l7tsXhvQOaz9nn7Aa2JuAyjHN5QTVrxlywRxklHDixA.
Are you sure you want to continue connecting (yes/no/[fingerprint])? yes
Warning: Permanently added '[localhost]:7077' (ECDSA) to the list of known hosts
guest@localhost's password:     ← パスワードを入力する。エコーバックされない。Welcome to Ubuntu 24.04.2 LTS (GNU/Linux 6.11.0-25-generic x86_64).
...
$               ← Container 内の guest 権限の対話環境が開始する
- (Container 内の guest 権限で) ユーザ名を表示する。
$ whoami
guest
- (Container 内の guest 権限で) ホームディレクトリを表示する。
$ pwd
/home/guest
- (Container 内の guest 権限で) ホームディレクトリにあるファイルの一覧を表示する。
$ ls -la
total 24
drwxr-x--- 3 guest guest 4096 Nov  3 01:08 .
drwxr-xr-x 1 root  root  4096 Nov  3 01:04 ..
-rw-r--r-- 1 guest guest  220 Jan  6  2022 .bash_logout
-rw-r--r-- 1 guest guest 3771 Jan  6  2022 .bashrc
drwx------ 2 guest guest 4096 Nov  3 01:07 .cache
-rw-r--r-- 1 guest guest  807 Jan  6  2022 .profile
-rw-r--r-- 1 guest guest    0 Nov  3 01:08 .sudo_as_admin_successful
- (Container 内の guest 権限で) ssh 経由の対話環境を終了する。
guest@af401d3cdf85:~$ exit
logout
Connection to localhost closed.
$
他のPCからネットワーク経由で Container 内の対話環境にアクセスする
- (ホストOS上) 外部のPCからネットワーク経由で Container にアクセスするためには、ホストOSの 7077 番ポートを開けておく必要がある。
Docker の公式文書では、「docker のポートフォワーディングは ufw のフィルタリングよりも前に行わるために、ufw の影響を受けない」
と記述されている (2025年春時点) が、これは現時点では間違いのようだ。
Containerに外部からアクセスするためには、ホストOSのポートを開けておく必要がある。
Windows 11 の場合:
「設定」→「ネットワークとインターネット」→「ネットワークの詳細設定」→「Windows ファイアウォール」→ 詳細設定
- ssh 用のポートを開ける。
ローカルコンピューターのセキュリティ
→ 受信の規則
→ 新しい規則
→ 規則の種類「ポート」 → 次へ
→ プロトコルおよびポート → TCP → 特定のローカルポート → 7070-7079 → 次へ
→ 操作「接続を許可する」→ 次へ
→ プロファイル: ドメイン、プライベート、パブリックのすべてをチェックする
→ 名前: docker ssh → 完了
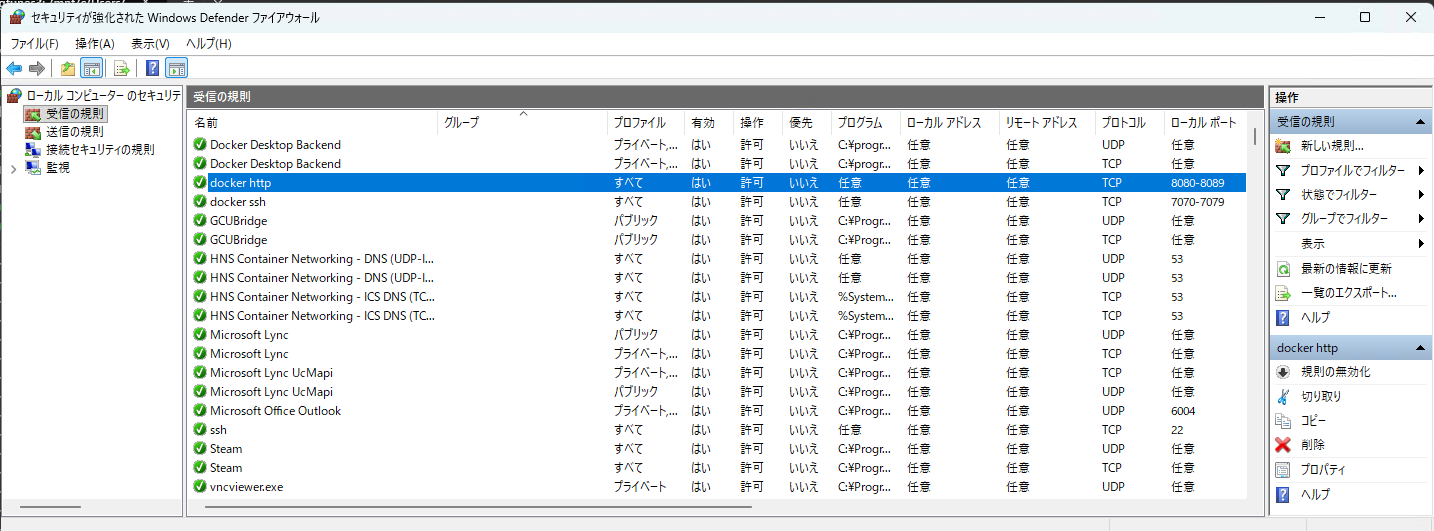
- WWWサーバ (jupyter) 用のポートを開ける
上と同様で → ... →
→ プロトコルおよびポート → TCP → 特定のローカルポート → 8080-8089 → 次へ → ...
→ 名前: docker http → 完了
Ubuntu 24.04LTS の場合:
ufw を用いる
- (ホストOS上) ファイアウォール ufw を有効化する。(既に有効化してあれば必要なし)
  $ sudo apt update                          ← aptのデータベースを更新する
  $ sudo apt install -y ufw                  ← ufw をインストールする。
  $ sudo systemctl enable ufw                  ← ufw を有効化する
  $ sudo systemctl restart ufw                  ← ufw を再起動する
- (ホストOS上) ホストOSの 7077 番ポートを開放する。
  $ sudo ufw allow 7077                          ← 7077 番ポートを開放する
  ルールを追加しました
  ルールを追加しました (v6)
- (ホストOS上) ファイアウォールの状態を確認する。
  $ sudo ufw status 7077                          ← 7077 番ポートを開放する
  ...
状態: アクティブ

To                         Action      From
--                         ------      ----
...
7077                      ALLOW       Anywhere
...
7077 (v6)                 ALLOW       Anywhere (v6)
  ...
- (ネットワーク上の他のPC) 他のマシンから、ホストOS上の Container に ssh 接続する。
以下は、ホストOSの IPアドレスが 192.168.12.10 の場合の、ssh アクセスの様子である。
(他のPCから)
$
ssh -p 7077 guest@192.168.12.10
guest@192.168.12.10's password:
← パスワードを入力する。エコーバックされない。
Welcome to Ubuntu 24.04.2 LTS (GNU/Linux 6.11.0-25-generic x86_64)
...
guest $
whoami ← Container に
guest 権限でアクセスできる
guest
guest $
exit
logout
Connection to 192.168.12.10 closed.
$
Container が再起動すると sshd も自動起動されることを確認する
- (ホストOS上で) Container を停止する
$ docker container stop llmdiy_01b
- (ホストOS上で) Container が停止されたことを確認する
$ docker container ls
CONTAINER ID   IMAGE           COMMAND            CREATED         STATUS         PORTS          NAMES
- (ホストOS上で) 停止中の Container を起動する
$ docker start llmdiy_01b
- (ホストOS上で) Container に ssh でアクセスして、sshd が自動的に起動していることを確認する。
$ ssh -p 7077 guest@localhost            ← ホストOSの 7077 番ポートに sshアクセスする
guest@localhost's password:     ← パスワードを入力する。エコーバックされない。Welcome to Ubuntu 24.04.2 LTS (GNU/Linux 6.11.0-25-generic x86_64)
...
$               ← Container 内の guest 権限の対話環境が開始する
Docker ホストOSのファイルシステム上に、Container の guest ユーザの作業領域を確保する
公式のソースコードを実行すると、モデルのパラメータの保存にかなり多くのファイルシステム領域を消費してしまう。
そこで、Docker ホストOS上の永続的なファイルシステムを Container からマウントして、その上で作業する。
- Container に ssh でアクセスする。
$ ssh -p 7077 guest@localhost            ← ホストOSの 7077 番ポートに sshアクセスする
guest@localhost's password:     ← パスワードを入力する。エコーバックされない。Welcome to Ubuntu 24.04.2 LTS (GNU/Linux 6.11.0-25-generic x86_64)
...
$               ← Container 内の guest 権限の対話環境が開始する
- root 権限で、/mnt/hostos に guest ユーザの作業領域を作成する。
$ sudo mkdir /mnt/hostos/guest
- root 権限で、/mnt/hostos/guest の所有者を guest ユーザに変更する。
$ sudo chmod guest.guest /mnt/hostos/guest
「つくって学ぶ!LLM自作」入門のソースコードを使って jupyter サーバを動作させる。
- guest ユーザとして ssh 接続する。
- カレントディレクトリを作業用のフォルダに移動する。
$ cd /mnt/hostos/guest
- github からソースコードをダウンロードする。
$ git clone https://github.com/rasbt/LLMs-from-scratch.git
- ./LLMs-from-scratch/ フォルダに移動してから、jupyter lab を起動する。
$ cd LLMs-from-scratch
$ jupyter lab --allow-root --ip=0.0.0.0 --no-browser --NotebookApp.token='xxx'
- 他のマシンからアクセスするには "--ip=0.0.0.0" の指定が必要。
- rootユーザとして jupyter を起動するには --allow-root が必要。今は guest ユーザ権限で起動しているので必要ない。
- token を自分で指定したい場合は --NotebookApp.token='xxx' で指定する。xxx は推測されにくい文字列を選ぶこと。
- 起動時に token を指定しなかった場合は、表示される URL の中の "token=..." の部分の文字列が token となる。
- 動作中の jupyter notebook の token を知るには、同じマシンの別のシェルで以下のコマンドを実行する。
$ jupyter lab list
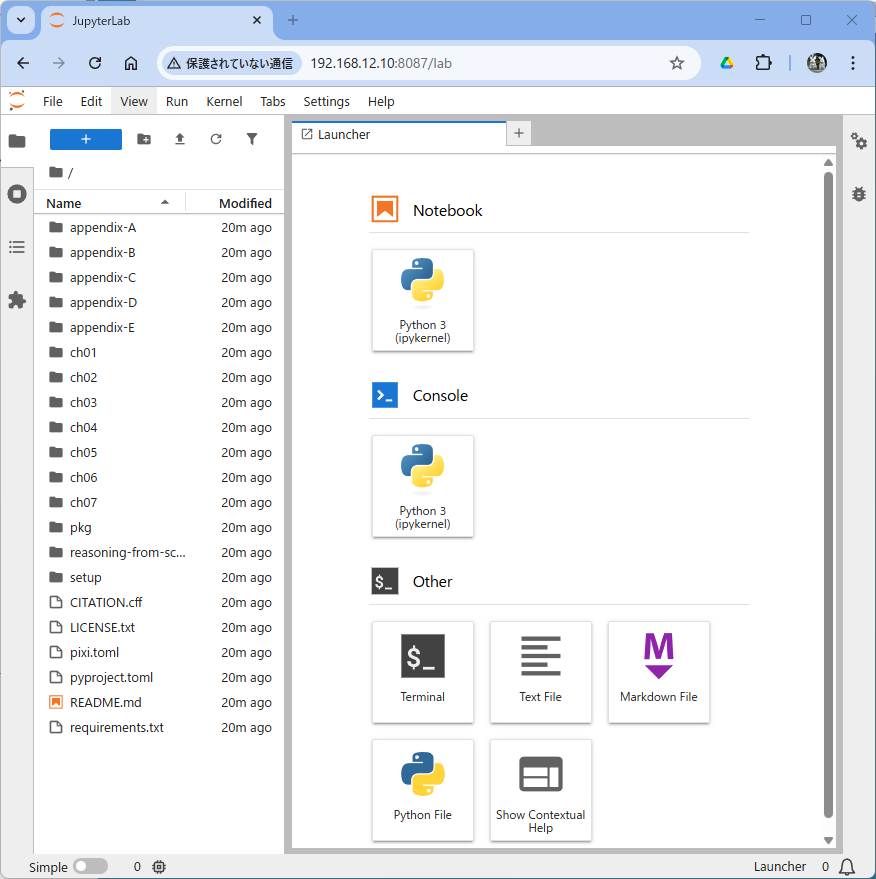
外部のマシンからブラウザで jupyter サーバに接続する。
- ローカルネット内のリモートマシンからアクセスする。
http://192.168.12.10:8087/lab?token=xxx
- インターネット上のリモートマシンからアクセスする場合の URL:
(ルータで 18087 番ポートを 192.168.12.10:8087 にポートフォワーディングしている場合)
http://ynitta.net:18087/lab?token=xxx