Install CUDA and cuDNN.
While sometimes asking for "deplolyment folder location" on the way, you can accept the default.
Deployment path: (Default)
C:\Users\USERNAME\AppData/Local/Temp/CUDA
As of Oct/2018, it was the next package for Windows 10.
cuDNN v7.3.1 [Sept 28, 2018], for CUDA 9.0
  cuDNN v7.3.1 Library for Windows 10
The path of the folder is represented by PATH.
copy PATH\cuda\bin\cudnn64_7.dll  C:\Program Files\NVIDIA GPU Computing Toolkit\CUDA\v9.0\bin
copy PATH>\cuda\ include\cudnn.h  C:\Program Files\NVIDIA GPU Computing Toolkit\CUDA\v9.0\include
copy PATH>\cuda\lib\x64\cudnn.lib  C:\Program Files\NVIDIA GPU Computing Toolkit\CUDA\v9.0\lib\x64
  variable naem:   CUDA_PATH
  variable value:  C:\Program Files\NVIDIA GPU Computing Toolkit\CUDA\v9.0
If you just run tensorflow-gpu on python, it works just for "Cuda 9" and "cuDNN". However, in order to compile the CUDA program by yourself, you need to install the "CUDA Toolkit".
https://docs.nvidia.com/cuda/cuda-installation-guide-microsoft-windows/index.html
CUDA_Installation_Guide_Windows.pdf (loca copy)
C:\Program Files\NVIDIA GPU Computing Toolkit\CUDA\v10.0
C:\Program Files\NVIDIA GPU Computing Toolkit\CUDA\v10.0
When installing "cuDNN", you set the environment variable CUDA_PATH manually, but it is changed automatically by the "CUDA Toolkit" installer.
C:\Program Files\NVIDIA GPU Computing Toolkit\CUDA\v10.0\extras\demo_suite
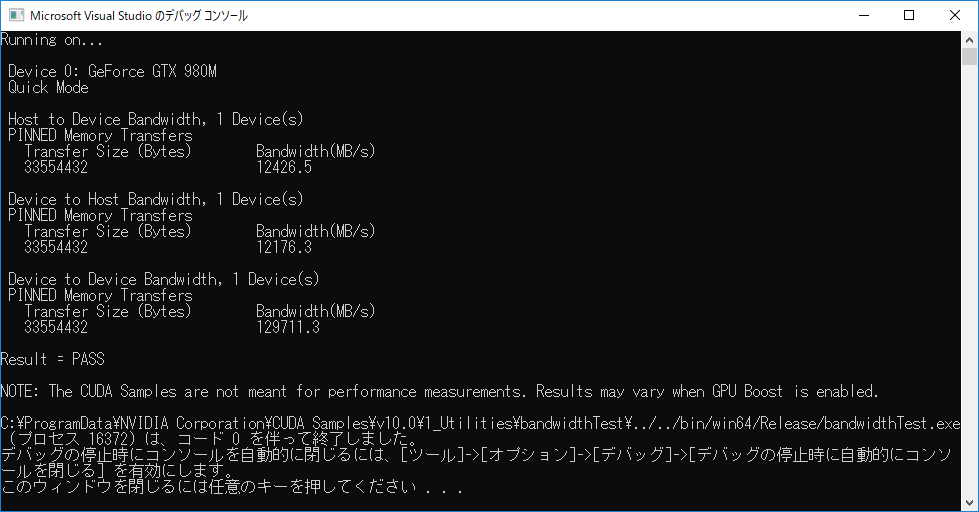
In order to confirm the correct installation, run the programs like bandwidthTest.exe, deviceQuery.exe, nbody.exe oceanFFT.exe, etc.
C:\Program Files\NVIDIA GPU Computing Toolkit\CUDA\v10.0\extras\visual_studio_integration\MSBuildExtensions
C:\ProgramData\NVIDIA Corporation\CUDA Samples\v10.0
Environment variable is set automatically by the Build Customization CUDA 10.0.props file which exists in the following path.
[For VS2015]  C:\Program Files (x86)\MSBuild\Microsoft.Cpp\v4.0\V120\BuildCustomizations
[For VS2017]  C:\Program Files (x86)\Microsoft Visual Studio\2017\Professional\Common7\IDE\VC\VCTargets\BuildCustomizations
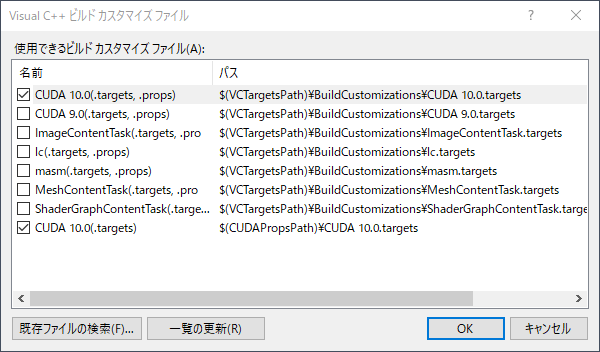
When you compile your cuda application with Visual Studio, set the dependencies of build to "Cuda 10.0(.progs) checked.
File → New Project ... → NVIDIA &arr; CUDA 10.0 &arr; CUDA 10.0 RuntimeTo refer custom CUDA Toolkit, Set CUDA C/C++ → Common → CUDA Toolkit Custom Dir
right click on the project name → "build dependencies" → "Build customization"
→ "CUDA 10.0(.targets, props)" is checked.
OR
right click on the project name → Properties → CUDA C/C++ →、Common → CUDA Toolkit Custom Dir →
set $(CUDA_PATH)
file:///C:/Program%20Files/NVIDIA%20GPU%20Computing%20Toolkit/CUDA/v10.0/doc/html/index.html